Block Ads Across Your Network
Set up Pi-hole on a Raspberry Pi using Docker to block ads network-wide and route all your devices through a DNS-level proxy — no browser extensions needed.
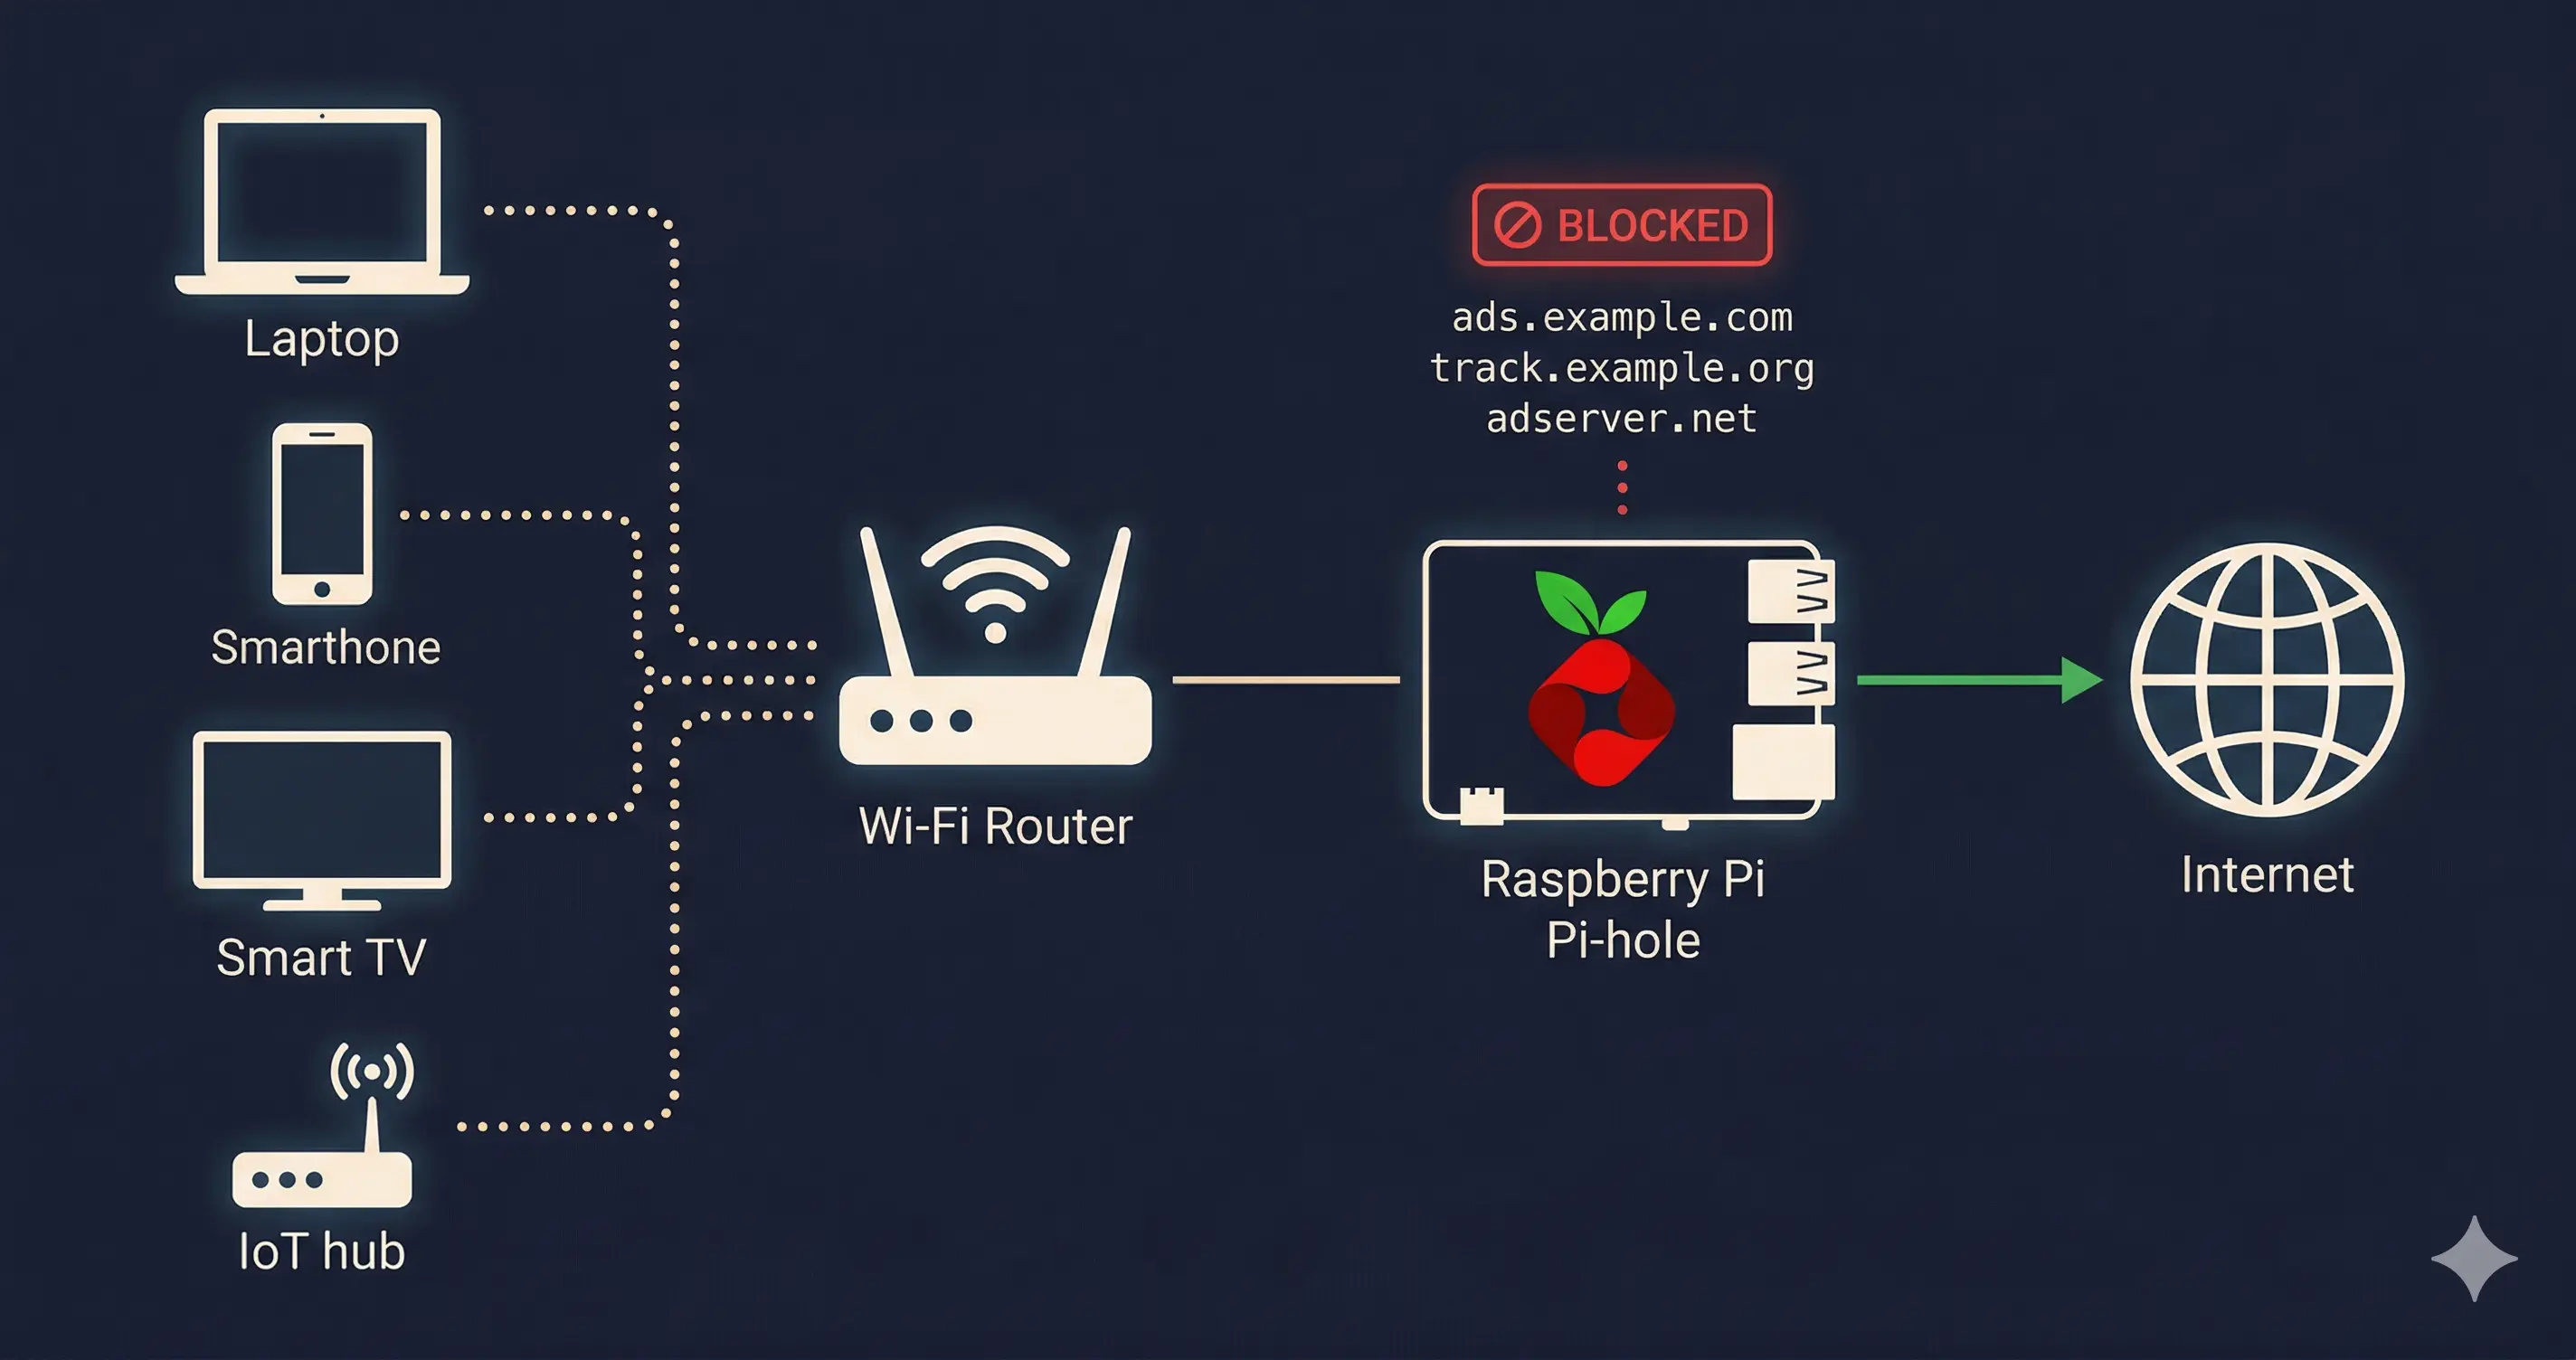
Browser ad blockers only work in the browser. Pi-hole works at the DNS level — which means it blocks ads, trackers, and telemetry across every device on your network. Your phone, smart TV, IoT devices, everything. And you don't need to install anything on any of them.
In this guide, I'll walk you through setting up Pi-hole on a Raspberry Pi using Docker, and then configuring your network so all traffic routes through it automatically.
What You'll Need
- A Raspberry Pi (any model with networking — Pi 3, 4, or 5 work great)
- Raspberry Pi OS installed and SSH access
- Docker and Docker Compose installed on the Pi
- About 10 minutes
If you don't have Docker installed yet, you can get it with a single command:
curl -sSL https://get.docker.com | sh
sudo usermod -aG docker $USERLog out and back in for the group change to take effect.
Step 1: Create the Docker Compose File
SSH into your Raspberry Pi and create a directory for Pi-hole:
mkdir pi-hole && cd pi-holeCreate a docker-compose.yml file:
nano docker-compose.ymlPaste the following configuration:
# More info at https://github.com/pi-hole/docker-pi-hole/
# and https://docs.pi-hole.net/
services:
  pihole:
    container_name: pihole
    image: pihole/pihole:latest
    ports:
      # DNS Ports
      - "53:53/tcp"
      - "53:53/udp"
      # Default HTTP Port
      - "80:80/tcp"
      # Default HTTPs Port. FTL will generate a self-signed certificate
      - "443:443/tcp"
    environment:
      # Set your timezone from:
      # https://en.wikipedia.org/wiki/List_of_tz_database_time_zones
      TZ: "Asia/Kolkata"
      # Set a password for the web interface
      FTLCONF_webserver_api_password: "your-secure-password-here"
      # Required when using Docker's default bridge network
      FTLCONF_dns_listeningMode: "ALL"
    volumes:
      # Persist Pi-hole's databases and configuration
      - "./etc-pihole:/etc/pihole"
    cap_add:
      - NET_ADMIN
      - SYS_TIME
      - SYS_NICE
restart: unless-stoppedSave and exit (Ctrl+X, then Y, then Enter).
A few things to change:
TZ— Set this to your actual timezone. I'm usingAsia/Kolkata, but if you're in the US, something likeAmerica/New_Yorkworks.FTLCONF_webserver_api_password— Pick a real password. You'll use this to log into the Pi-hole dashboard.
Step 2: Start Pi-hole
Bring up the container:
docker compose up -dDocker will pull the Pi-hole image and start the container. Give it a minute to initialize. You can check the logs to make sure everything started cleanly:
docker compose logs -f piholeOnce you see FTL started! in the logs, you're good.
Alternative: Run Without Docker Compose
If you prefer a single command without a compose file, you can use docker run directly:
docker run -d \
  --name pihole \
  -p 53:53/tcp \
  -p 53:53/udp \
  -p 80:80/tcp \
  -p 443:443/tcp \
  -e TZ=Asia/Kolkata \
  -e FTLCONF_webserver_api_password="your-secure-password-here" \
  -e FTLCONF_dns_listeningMode=all \
  -v ./etc-pihole:/etc/pihole \
  --cap-add NET_ADMIN \
  --restart unless-stopped \
pihole/pihole:latestBoth approaches give you the same result. I prefer the compose file because it's easier to tweak and version control.
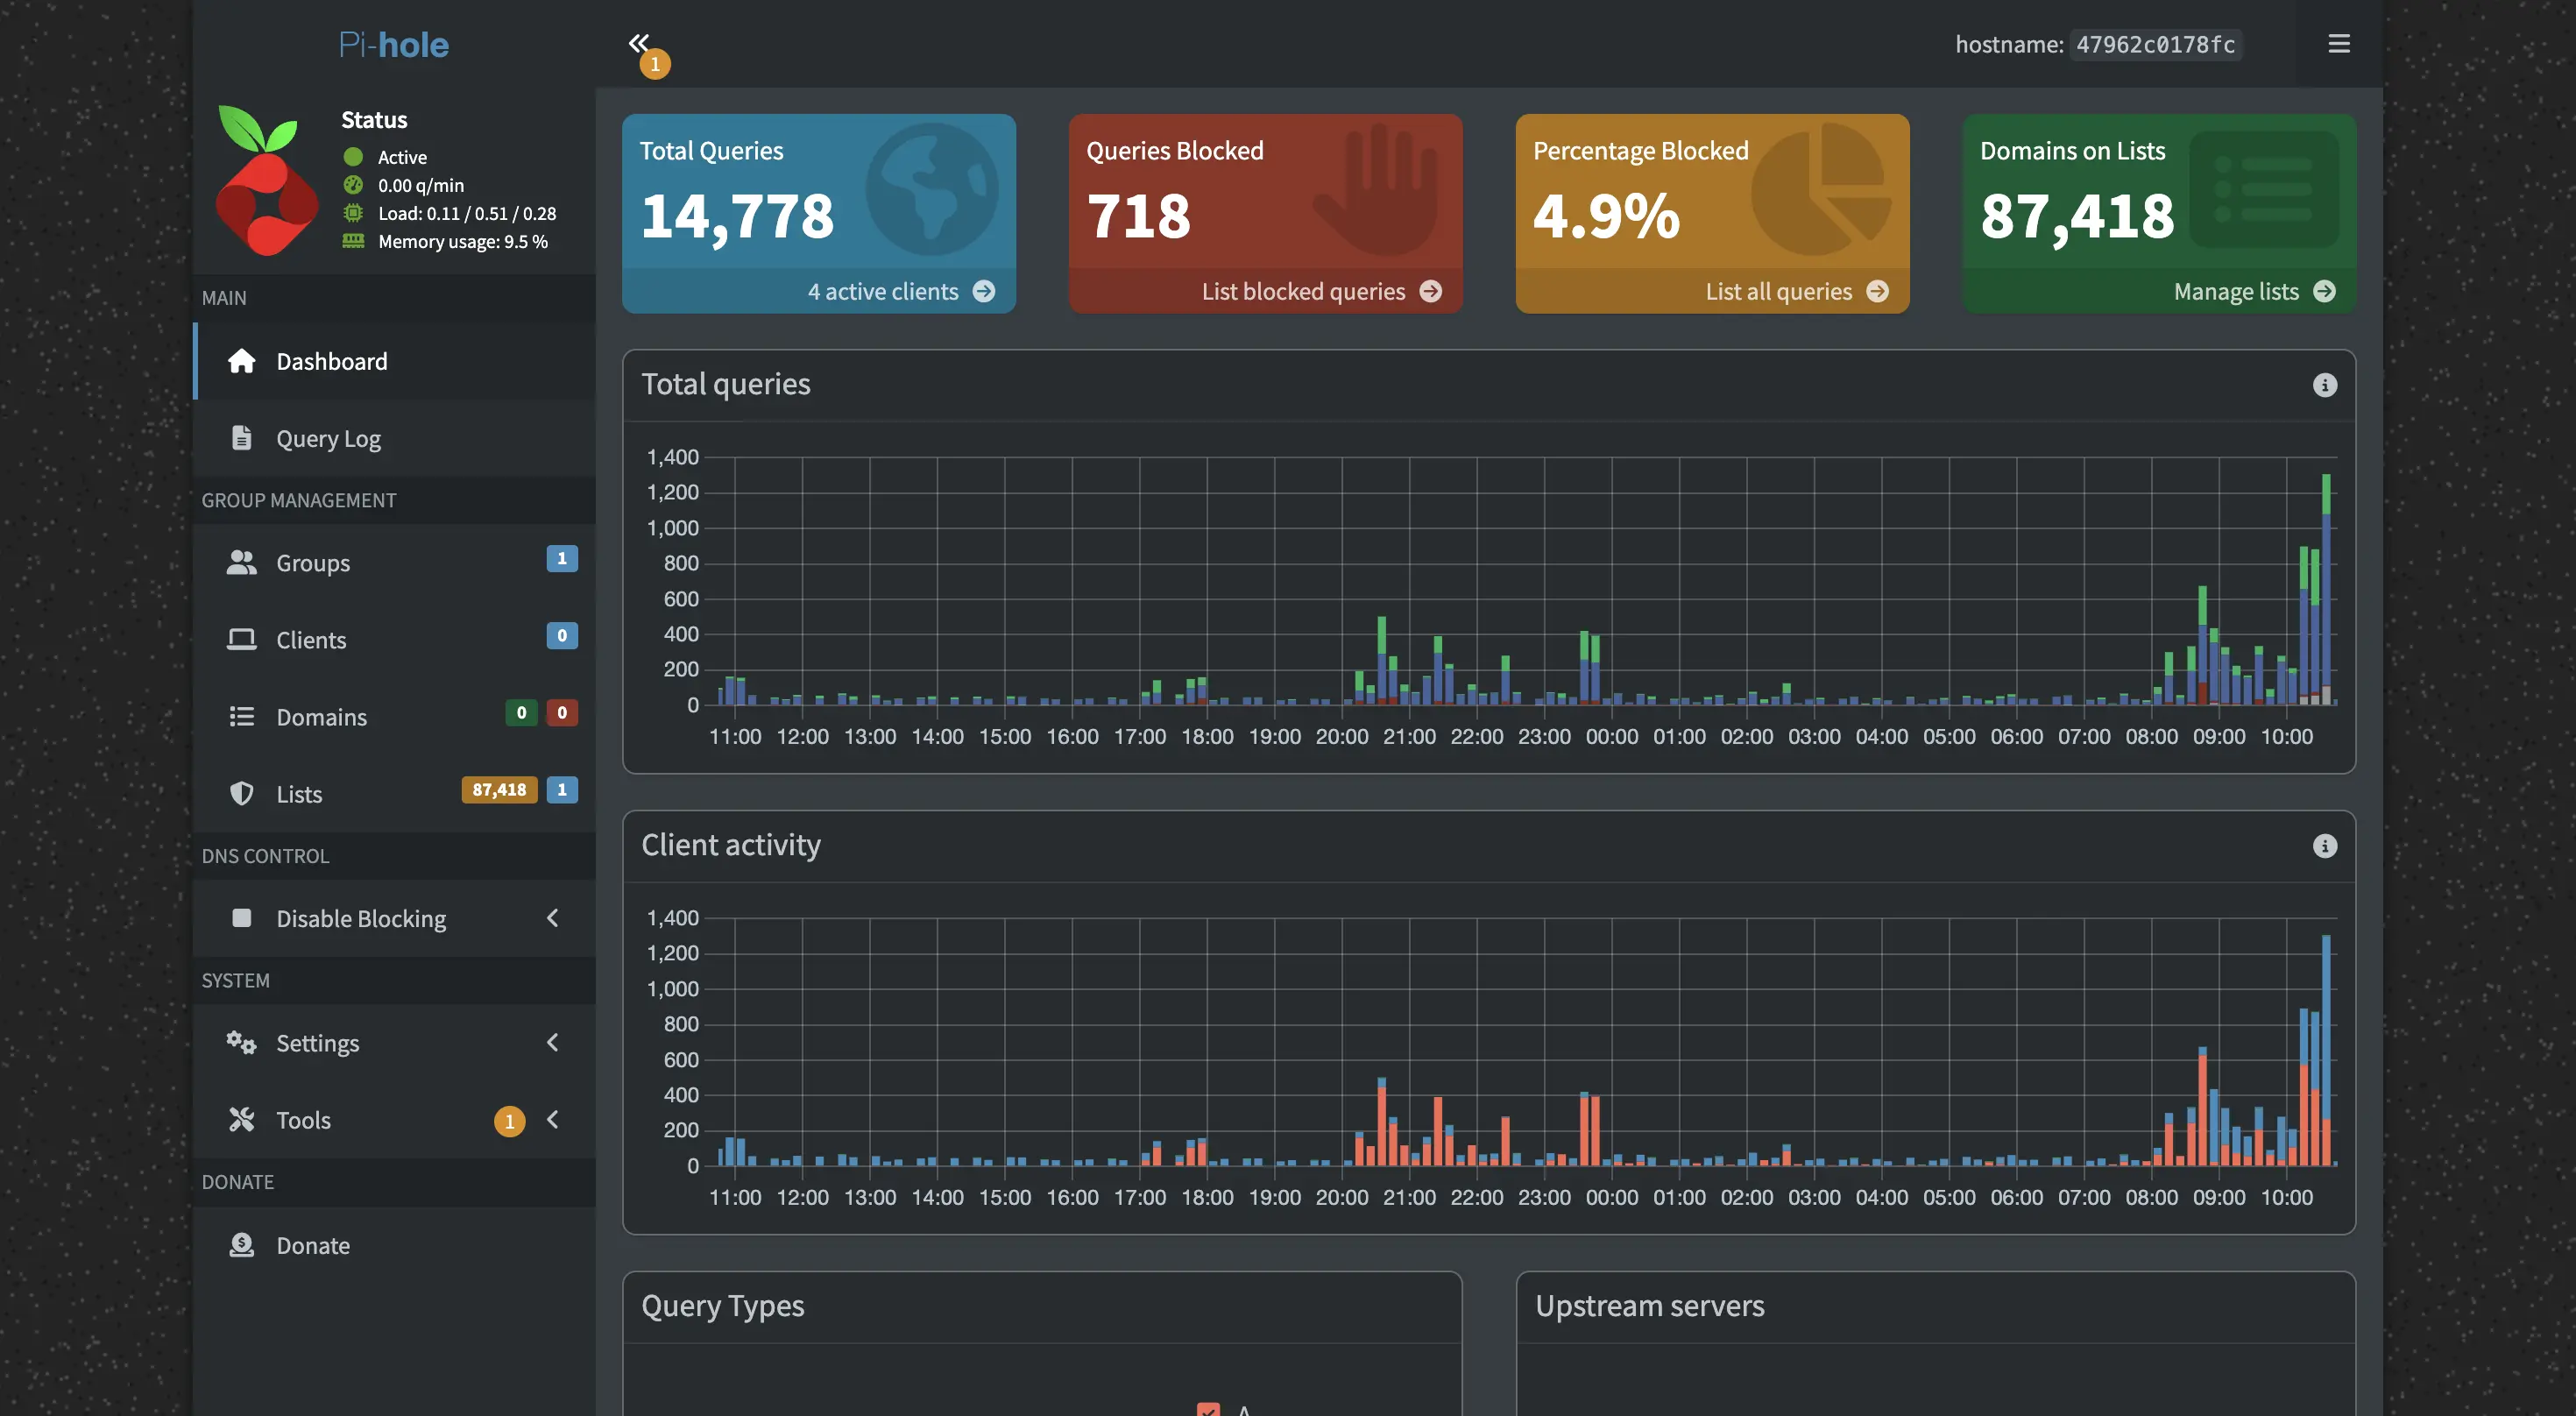
Step 3: Access the Dashboard
Once Pi-hole is running, open your browser and go to:
http://<YOUR_PI_IP>/admin/
Replace <YOUR_PI_IP> with your Raspberry Pi's local IP address (something like 192.168.1.42). If you don't know the IP, run hostname -I on the Pi.
Log in with the password you set in the FTLCONF_webserver_api_password variable.
Step 4: Route Your Network Through Pi-hole
This is where the magic happens. You have two options depending on how much of your network you want to cover.
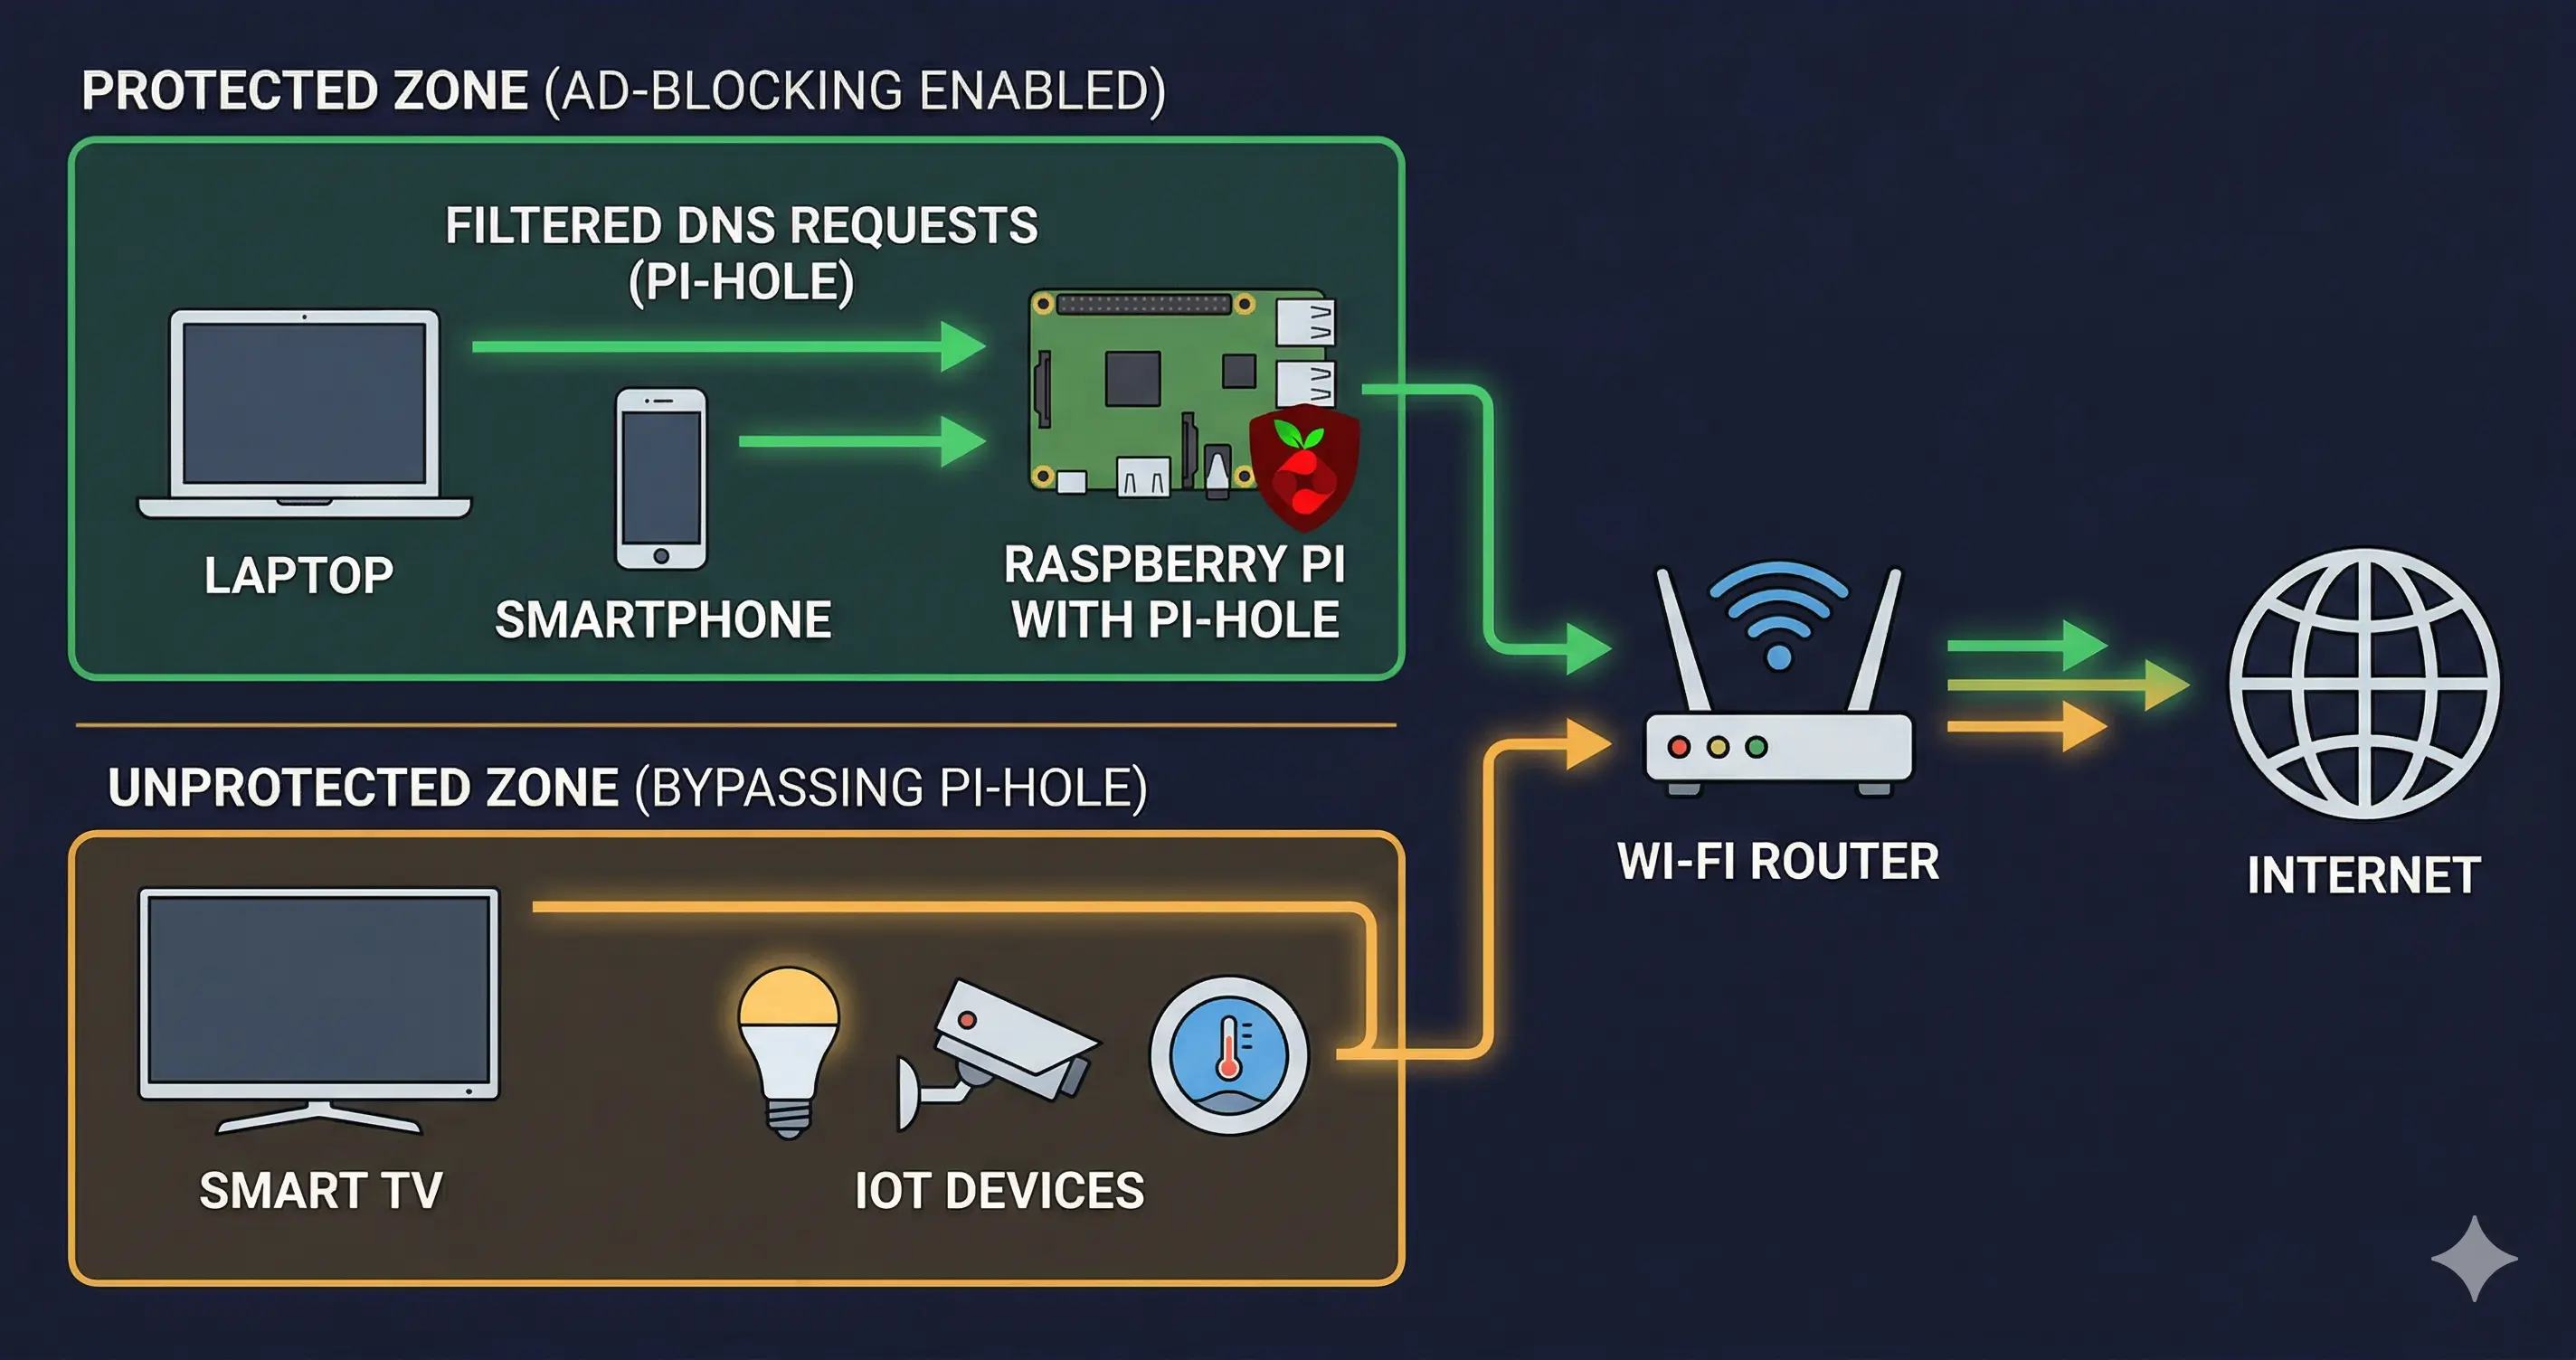
Option A: Block Ads on Your Entire Network (Router Level)
This is the recommended approach. By changing the DNS settings on your router, every device that connects to your Wi-Fi will automatically use Pi-hole — phones, laptops, smart TVs, game consoles, everything.
- Log into your router's admin panel (usually at
192.168.1.1or192.168.0.1) - Find the DNS settings — this is usually under WAN, DHCP, or Internet settings
- Set the Primary DNS to your Raspberry Pi's IP address
- Set the Secondary DNS to a fallback like
1.1.1.1(Cloudflare) or8.8.8.8(Google) - Save and reboot the router
After devices renew their DHCP lease (or you reconnect to Wi-Fi), all DNS queries will flow through Pi-hole. You'll start seeing traffic in the dashboard immediately.
Note: Some ISP-provided routers don't let you change DNS settings. If that's the case, use Option B or consider getting your own router.
Option B: Block Ads on a Specific Device
If you only want Pi-hole on certain devices (or your router doesn't support custom DNS), you can change the DNS settings on individual devices.
On macOS: System Settings → Wi-Fi → Details → DNS → Add your Pi's IP
On Windows: Settings → Network & Internet → Wi-Fi → Hardware properties → DNS server assignment → Manual → Add your Pi's IP
On iPhone/Android: Wi-Fi settings → Your network → Configure DNS → Manual → Add your Pi's IP
Step 5: Verify It's Working
After configuring DNS, run a quick test. Open a terminal on any device using Pi-hole and run:
nslookup ads.google.comIf Pi-hole is working, you'll see the query resolve to 0.0.0.0 — meaning the ad domain is being blocked at the DNS level. You can also visit a site that's normally full of ads and see the difference.
Back on the Pi-hole dashboard, you'll see your query count climbing and blocked queries showing up in real-time.
Adding More Blocklists
Pi-hole's default blocklist is decent, but you can add more. In the dashboard, go to Adlists and add URLs for community-maintained blocklists. Some popular ones:
- Steven Black's Unified Hosts — ads + malware
- OISD — curated list balancing blocking and usability
- Hagezi's DNS Blocklists — multiple tiers from light to aggressive
After adding new lists, run Update Gravity from the dashboard to pull in the new domains.
Troubleshooting
Port 53 already in use? If you're running Ubuntu on the Pi, systemd-resolved might be using port 53. Disable it:
sudo systemctl disable systemd-resolved
sudo systemctl stop systemd-resolvedCan't access the dashboard? Make sure port 80 isn't being used by another service. Check with sudo lsof -i :80.
Devices not using Pi-hole? Some devices (like Chromecast or certain Android phones) have hardcoded DNS servers. You can work around this by setting up firewall rules on your router to redirect all DNS traffic (port 53) to the Pi.